How to Replace a Faucet: A Step-by-Step Guide
How to Replace a Faucet: A Step-by-Step Guide
Is your faucet outdated, leaking, or simply not matching your kitchen or bathroom’s aesthetic? Replacing a faucet is a straightforward DIY project that can enhance both the functionality and appearance of your space. With the right tools and a bit of patience, you can install a new faucet in just a few hours.
Tools and Materials Needed:
- Adjustable wrench
- Basin wrench
- Bucket
- Plumber’s tape
- New faucet
- Supply lines (if not included with the faucet)
- Silicone caulk or plumber’s putty
- Cleaning supplies (rag, mild cleaner)
Step-by-Step Instructions:
- Turn Off the Water Supply:
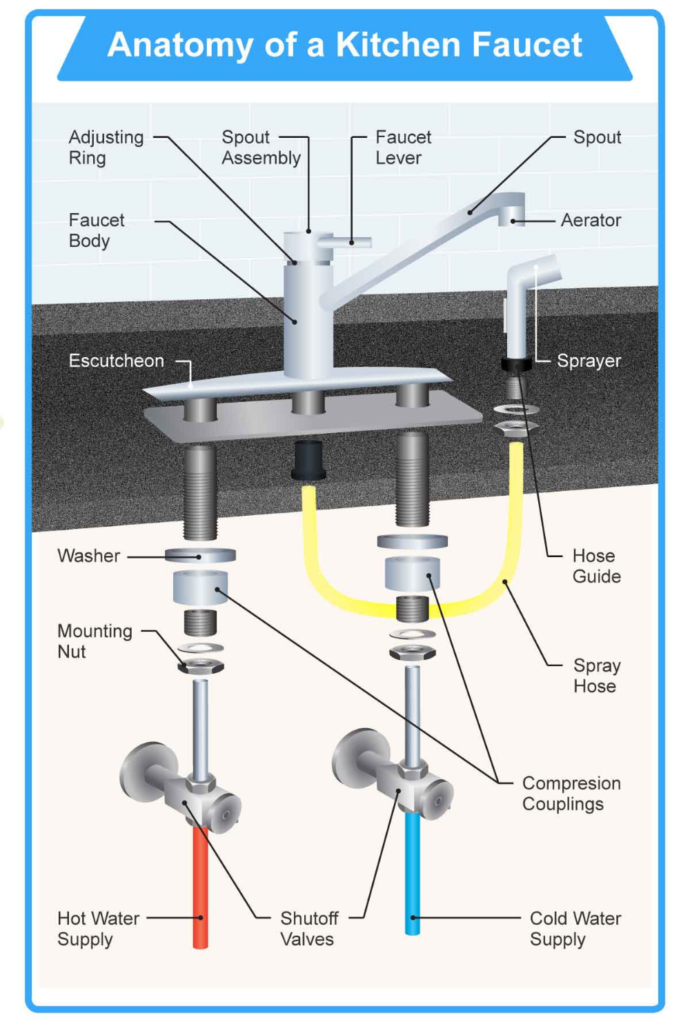
- Locate the shut-off valves under the sink and turn them clockwise to close. If your sink doesn’t have individual shut-off valves, you’ll need to turn off the main water supply to your home.
- Open the faucet to release any remaining water and relieve pressure in the lines.
- Prepare Your Workspace:
- Clear out the area under the sink to provide ample working space.
- Place a bucket beneath the sink to catch any residual water during the removal process.
- Disconnect the Water Supply Lines:
- Using an adjustable wrench, disconnect the hot and cold water supply lines from the faucet. Be prepared for a small amount of water to drain out.
- Remove the Old Faucet:
- Loosen and remove the mounting nuts securing the faucet to the sink using a basin wrench.
- Carefully lift the old faucet out from the top of the sink.
- Clean the Area:
- Thoroughly clean the surface of the sink where the old faucet was installed, removing any old caulk, plumber’s putty, or debris.
- Install the New Faucet:
- Follow the manufacturer’s instructions for your specific faucet model.
- Apply plumber’s putty or silicone caulk to the base of the new faucet to create a watertight seal.
- Insert the faucet into the mounting holes on the sink.
- From beneath the sink, secure the faucet by tightening the mounting nuts. Ensure the faucet is properly aligned before fully tightening.
- Reconnect the Water Supply Lines:
- Attach the hot and cold water supply lines to the corresponding valves on the faucet. Use plumber’s tape on the threads to ensure a secure, leak-free connection.
- Test the New Faucet:
- Turn the water supply valves back on.
- Slowly open the faucet to check for proper operation and inspect all connections for leaks.
Enhance Efficiency with a Faucet Aerator:
Consider installing a faucet aerator to improve water efficiency. Aerators mix air into the water stream, reducing flow without compromising pressure. This simple addition can lead to significant water conservation and lower utility bills.
Safety Tips:
- Always double-check that the water supply is turned off before beginning any plumbing work.
- Wear safety glasses to protect your eyes from debris.
- If you encounter any issues or feel uncomfortable during the process, consult a professional plumber.
By following these steps, you can successfully replace your faucet, enhancing both the look and functionality of your kitchen or bathroom.
![]()